ph-municipalities
⚠️ Warning
Starting on August 31, 2025, PAGASA will permanently discontinue its downloadable 10-Day Weather Forecast Excel files.
After this date, ph-municipalities classes, scripts, and CLI will no longer fetch new forecast or location data from PAGASA. The tool will only work with:
- Its default archived Excel file, or
- Archived Excel files stored in the
/archivesbranch (via GitHub raw URLs, and no new files will be added).🟠 From then on, results will reflect only static archived Excel files (no longer updated), suitable for reference or testing.
➡️ This limitation comes directly from PAGASA discontinuing Excel downloads, not from a removal of functionality in ph-municipalities.
💡 NOTE: ph-municipalities is not designed to sync with the PAGASA TenDay API, and it has no immediate plans for fetching live data from that service.
For details and discussion, see Issue #156 or jump to the Discontinuation of PAGASA Excel Files FAQs.
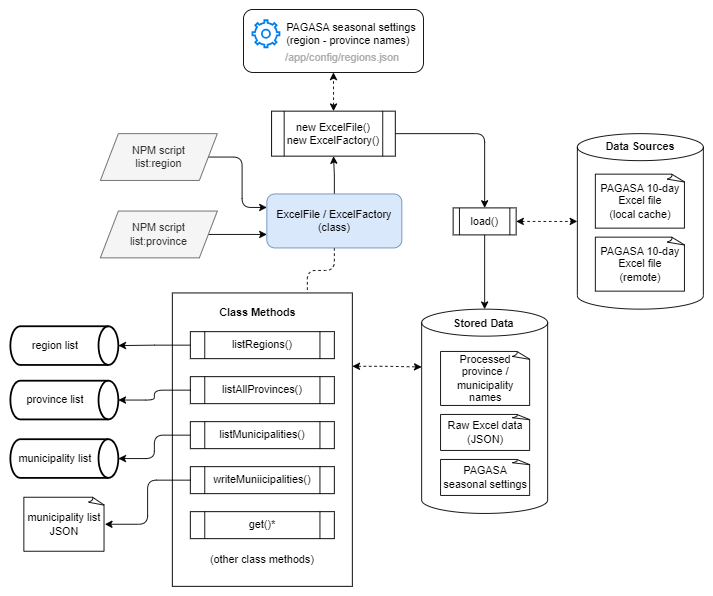
The ph-municipalities NPM package provides NPM scripts that allow interactive querying of Philippine municipalities included in one or more provinces or from a whole region, with an option of writing them to JSON files from the command line through a CLI-like application and classes for only parsing and listing municipality names and provinces from Excel file data sources.
It uses a PAGASA 10-day weather forecast Excel file in /app/data/day1.xlsx (downloaded and stored as of this 20220808) from PAGASA's 10-Day Climate Forecast web page as the default data source.
Since the PAGASA 10-day weather forecast Excel files do not have region names, the parser scripts sync it with the PAGASA Seasonal weather forecast regions and province names defined in the manually-encoded
/app/config/regions.jsonfile to determine the region names. The classes also provide an option to specify a new region name configuration file on initialization.
It also asks users to key in the file download URL of a remote PAGASA 10-Day weather forecast Excel file should they want to use another Excel file for a new and updated data source.
INFO: When installing the package using
npm i ph-municipalities, the default data source is inside/data/day1.xlsx. All source codes and files are also inside the ph-municipalities root directory.
Architecture Diagram
Dataset Output
Extracted municipalities are written in JSON files following the format:
{
  "metadata": {
    "source": "https://pubfiles.pagasa.dost.gov.ph/pagasaweb/files/climate/tendayweatheroutlook/day1.xlsx",
    "title": "List of PH Municipalities By Province and Region",
    "description": "This dataset was generated with reference to the Excel file contents from the source URL on 20220808.",
    "date_created": "Mon Aug 08 2022"
  },
  "data": {
    "Albay": ["Bacacay", "Camalig", ... ],
    "Camarines Norte": ["Basud", "Capalonga", ... ],
    "Camarines Sur": ["Baao", "Balatan", ... ],
    ...
  }
}
Pre-compiled windows binaries are available for download in the latest Releases download page.
Class Documentation
- Class and methods documentation is available at https://ciatph.github.io/ph-municipalities.
- Class source codes are available at the ph-municipalities GitHub repository.
- The NPM package is available at https://www.npmjs.com/package/ph-municipalities
- Refer to the Building the Class Documentation section for more information about updating and building the class documentation.
Contributing
We welcome contributions! Please see CONTRIBUTING.md for guidelines.
Requirements
The following dependencies are used for this project. Feel free to use other dependency versions as needed.
Requirements list
- Windows 10 OS
- nvm for Windows v1.1.9
- NodeJS LTS v16 or higher, installed using nvm
Recommended: node v16.14.2 npm v8.5.0 - Excel file
- ph-municipalities uses a PAGASA 10-Day Forecast Excel file in the
/app/datadirectory as data source. - At minimum, the Excel file should have a column that contains municipality and province names following the uniform pattern:
"municipalityName (provinceName)" - (Optional) The Excel file should have a row on the same column as above containing the text
"Municipalities"plus two (2) blank rows before rows containing municipality and province names to enable strict testing and validation of the number of parsed data rows - Checkout the Excel file format on the
/app/data/day1.xlsxsample file for more information
- ph-municipalities uses a PAGASA 10-Day Forecast Excel file in the
- (Optional) Download URL for a remote Excel file.
- See the
EXCEL_FILE_URLvariable on the Installation section.
- See the
- (Optional) Docker
- Use Docker for localhost development
- See the Docker Dependencies section for more information.
FAQs
What is the purpose or goal of ph-municipalities?
ph-municipalities aims to provide a simple, organized, and flexible interface for viewing, querying, and listing Philippine provinces and municipalities using the PAGASA 10-day weather forecast Excel files as the data source. It aims to enable easy extension of listing Philippine regions/provinces/municipalities for parsing PAGASA 10-day weather forecast data.
ph-municipalities evolved from basic procedural functions within a private backend project into a well-tested, documented, and modular open-source library, enabling broader community access and better code quality.
Its early stages were written as procedural functions for extracting 10-day weather forecast data from the PAGASA 10-day weather forecast Excel files. When the private project started gaining complexity, a need to separate the logic, management, and testing for listing the Philippine provinces and municipalities per region arose. Creating an independent, public, and open source version listing the provinces and municipalities per region was decided after experiencing drawbacks and difficulties testing using similar open source libraries (some of which are listed below) for that project.
ph-municipalities aim to contribute to the open source community by listing ONLY Philippine provinces and municipality names, using PAGASA's 10-day weather forecast Excel files, which are publicly accessible to everyone.
ph-municipalities is entirely public and open-source, and it has no linkage to private and proprietary source codes and resources.
Can ph-municipalities parse and extract PAGASA 10-day weather forecast data?
While ph-municipalities use a PAGASA 10-day weather forecast Excel file as a data source for its provinces and municipalities list, NO, it cannot parse and extract PAGASA 10-day weather forecast data.
ph-municipalities only have class methods for parsing, extracting, listing and querying provinces and municipalities names data from a PAGASA 10-day weather forecast Excel file. Refer to the ExcelFile class documentation for more information about its available methods.
Are there alternative libraries to ph-municipalities for listing Philippine provinces and municipalities?
Yes, several open source libraries and projects similar to ph-municipalities exist, which you can use in its place to list Philippine provinces and municipalities.
Here is a list of several of these libraries and code repositories. Note, however, that these items use old and new data sources. These may not be for you if you require using provinces and municipalities' names data from the PAGASA 10-day weather forecast Excel files.
Is it possible to make ph-municipalities parse and extract PAGASA 10-day weather forecast data?
While ph-municipalities do not support parsing and extracting PAGASA 10-day weather forecast data, you can extend the ExcelFile or ExcelFactory classes with custom logic and codes to enable parsing and extracting PAGASA 10-day weather forecast data.
Since the ExcelFile or ExcelFactory are JavaScript Classes (Functions in disguise, not true OOP, but inheritance still works), you can extend them with class inheritance, overriding or creating new class methods to accommodate processing the PAGASA 10-day weather forecast data. Refer to the ph-municipalities class documentation to know more about the available classes, member variables, and methods.
An example of extending the classes to parse PAGASA 10-day weather forecast data may go along the lines of:
const { ExcelFile } = require('ph-municipalities')

class PAGASATendayParser extends ExcelFile {
  /* Override constructor if necessary
  constructor (params) {
    super(params)

    // Custom class initialization logic here
  }
  */

  getWeatherData () {
    // Note: this.#data contains the "raw" original Excel rows data as JSON with weather data

    const weatherData = this.#data.reduce((list, row, index) => {
      // Write logic to parse and extract weather data here
    }, [])

    return weatherData
  }
}

const parser = new PAGASATendayParser()
weatherForecast = parser.getWeatherData()
How does ph-municipalities determine which provinces belong to a region?
The PAGASA 10-day Excel files only contain province and municipality names linked with weather data - it has no region information. Therefore, ph-municipalities link the province names in the 10-day Excel files to region/province names defined in the /app/config/regions.json file to determine which region they belong to.
The /app/config/regions.json file
This file contains region/province names mapping encoded manually with reference from the region and province names listed in the PAGASA Seasonal Forecast website's Forecast Analysis Rainfall table.
ph-municipalities expect similar region naming conventions from the PAGASA Seasonal Forecast and the PAGASA 10-Day Forecast since both are data products produced by PAGASA.
NOTE:
The region/province mapping defined in this file may become outdated as time passes. ph-municipalities users are encouraged to Use a Custom Configuration File, defining new region/province name mappings following the file's current format if they notice region-to-province inconsistencies in the generated municipality lists.
Are the provinces and municipality lists generated by ph-municipalities updated?
NO. By default, ph-municipalities use an outdated PAGASA 10-day Excel file for its local data source, downloaded on August 8, 2022. However, it also provides several ways for using updated PAGASA 10-day Excel files as data sources:
- Prompting to download an updated PAGASA 10-day Excel file using the Interactive CLI Scripts
- Providing class methods for programmatically downloading and using a remote PAGASA 10-day Excel file
- Allowing to override the default region - province mapping settings during class initialization (See Class Usage - Using a Custom Configuration File)
NOTE:
Overall, the provinces and municipality list rely on the latest contents of a PAGASA 10-day Excel file and manual configuration of region/province names mapping in the/app/config/regions.jsonfile (See Class Usage - Using a Custom Configuration File). It is not yet known and tested if these are in sync with the latest regions, provinces, and municipalities in the more standard and canon Philippine Standard Geographic Code (PSGC) data.
📉 Discontinuation of PAGASA Excel Files
As of August 31, 2025, PAGASA has discontinued its 10-Day Weather Forecast Excel files. From now on, ph-municipalities only works with static archived data.
For common questions (e.g., whether the tool will continue to access new data or why it can't use the API automatically), please refer to the FAQs below.
Will ph-municipalities get new data after August 31, 2025?
No. It only works with archived Excel files (see Discontinuation).
It applies to all classes, scripts, and CLI commands. None of them will fetch new forecasts or updated municipality lists.
Why can't ph-municipalities switch to the new PAGASA TenDay API automatically?
The PAGASA TenDay API requires an officially approved request token. This open-source project is not linked to an official PAGASA initiative, so token requests may not be granted.
💡 ph-municipalities will remain archived-only, unless integrated manually with the API by developers.
What should I use ph-municipalities for after August 31, 2025?
It can still be used as a reference or for testing with the archived Excel files.
For live weather and location updates, consider migrating to the official PAGASA TenDay API with an approved token.
My project depends on ph-municipalities. Will it break?
In short - yes, it will break when using its remote Excel file download URL that points to the DEFAULT_EXCEL_FILE_URL (see .env.example). It will also risk using outdated data when using the default archived Excel data sources.
Like mentioned, syncing with the PAGASA TenDay APIs is currently out of scope of ph-municipalities due to the reasons mentioned in the FAQs above. Projects depending on ph-municipalities should consider alternate options in accordance with the discontinuation of the PAGASA 10-Day Weather Forecast Excel files and the availability of the newly-released PAGASA TenDay APIs.
💡 NOTE: The open-source version of ph-municipalities provides better testing, documentation, and modularity compared to its original form as basic procedural functions in a private project. Even in an official project, developers would still need an approved API token and would need to shift from handling Excel files to handling PAGASA REST API responses.
Recommended Migration Steps
- Request an official API token from PAGASA to use the TenDay APIs.
- Stop using ph-municipalities (built only for the public PAGASA 10-Day Excel files) and implement your own TenDay API solution.
- (Optional) Extend ph-municipalities' classes by overriding fetch/receive logic to work with the new TenDay APIs, if you wish to continue using its location data utilities with updated data.
const { ExcelFile } = require('ph-municipalities')

class PAGASATendayAPI extends ExcelFile {
  /* Override constructor if necessary */
  constructor (params) {
    super(params)

    // - Custom class initialization logic here
  }

  async init () {
    // - Update class initialization logic
  }

  download () {
    // - Fetch from PAGASA TenDay APIs instead of Excel files
  }

  listRegions () { /* Fetch from API */ }
  listAllProvinces () { /* Fetch from API */ }
  listMunicipalities () { /* Fetch from API */ }

  ...
}

const pagasaAPI = new PAGASATendayAPI()
weatherForecast = pagasaAPI.listMunicipalities()
Table of Contents
Click to expand the table of contents
- ph-municipalities
- Class Documentation
- Requirements
- FAQs
- Table of Contents
- Installation
- Installation Using Docker
- Available Scripts
- Interactive CLI Scripts
npm start/npm run list:regionnpm run list:province
- NPM Scripts for Building Windows Executable Files of the Interactive CLI Scripts
npm run build:win:regionnpm run build:win:provincenpm run build:win:allnpm run minify:region
- NPM Scripts for Compiling the Interactive CLI Scripts into Stand-Alone Scripts
npm run minify:provincenpm run minify:all
- NPM Scripts for Building Documentation
npm run generate-docsnpm run docs:installnpm run docs:build
- NPM Scripts for Linting Files and Unit Testing
npm run lintnpm run lint:fixnpm testnpm run example
- Interactive CLI Scripts
- Class Usage
- Building Standalone Windows Executables
- Compiling into Single, Minified Files
- Building the Class Documentation
- Troubleshooting
Installation
-
Clone this repository.
git clone https://github.com/ciatph/ph-municipalities.git -
Install dependencies.
cd app npm install -
Create a
.envfile from the.env.examplefile inside the/appdirectory. Use the default values for the following environment variables.👉 Click to view the list of .env variables and their description.
INFO: If installed as an NPM package with
npm i ph-municipalities, create the.envfile inside the NPM project's root directory.Variable Name Description EXCEL_FILE_URL (Optional) Remote Excel file's download URL.
If provided, the Excel file will be downloaded and saved on the specifiedpathToFilelocal filesystem location during theExcelFileclass initialization.
Read on Class Usage for more information.DEFAULT_EXCEL_FILE_URL The default remote Excel file's download URL. ARCHIVED_EXCEL_FILE_URL Download URL of an archived remote Excel file to serve as fixtures with the discontinuation of the PAGASA 10-Day Excel files. ⚠️ Replace the value of
See Issue #156 for more information.EXCEL_FILE_URLandDEFAULT_EXCEL_FILE_URLwith its value starting on August 31, 2025 to avoid processing and test errors.SHEETJS_COLUMN Column name read by sheetjs in an Excel file.
This column contains the municipality and province names following the string pattern"municipalityName (provinceName)"
Default value is__EMPTYSORT_ALPHABETICAL Arranges the municipality names in alphabetical order.
Default value is1. Set to0to use the ordering as read from the Excel file.SPECIAL_CHARACTERS Key-value pairs of special characters or garbled text and their normalized text conversions, delimited by the ":"character.
Multiple key-value pairs are delimited by the","character.
If a special character key's value is a an empty string, write it as i.e.,:"some-garbled-text:"IMAGE_URL Raw URL of the README image file from this GitHub repository.
NOTE: Only add this variable in the GitHub Secrets for publishing to the NPM registry since NPM does not allow displaying images by relative path.
Installation Using Docker
We can use Docker to run dockerized Node app for local development mode. The following methods require Docker and Docker compose correctly installed and set up on your development machine.
Docker Dependencies
The following dependencies are used to build and run the image. Please feel feel free to use other OS and versions as needed.
- Ubuntu 22.04.1
- Docker version 23.0.1, build a5eeb1
- Docker Compose v2.16.0
- Microsoft Windows 10 Pro
- version 22H2 Build 19045.4651
- Docker Desktop
- Docker Compose version v2.27.1-desktop.1
- Docker Engine version 26.1.4, build 5650f9b
Docker for Localhost Development
Steps for using Docker with local development
-
Set up the environment variables for the
/appdirectory. Visit the Installation section, step #3 for more information. -
Stop and delete all docker instances for a fresh start.
-
NOTE: Running this script will delete all docker images, containers, volumes, and networks. Run this script if you feel like everything is piling but do not proceed if you have important work on other running Docker containers.
-
 sudo chmod u+x scripts/docker-cleanup.sh
 ./scripts/docker-cleanup.sh
 # Answer all proceeding prompts
-
-
Build and run the app using Docker.
- Build
docker compose build - Run
docker compose up - Stop
docker compose down
- Build
-
Edit and execute scripts within the running docker container from step #3.
- For running NPM scripts (see the Available Scripts section for more information):
docker exec -it ph-municipalities <NPM_SCRIPT> - For new scripts (example only):
docker exec -it ph-municipalities node ./src/new.js
- For running NPM scripts (see the Available Scripts section for more information):
Available Scripts
Note: These NPM scripts run relative within the
/appdirectory, when working on a git-cloned repository of the app. To run using only NodeJS, navigate first to the/appdirectory and execute a target script, for example:
cd app
npm run list:region
Interactive CLI Scripts
npm start / npm run list:region
- Asks users to enter the download URL of a remote Excel file or use the default local Excel file
- Loads and parses the local Excel file in
/app/data/day1.xlsxby default. - Loads and parses the downloaded Excel file to
/app/data/datasource.xlsxif download URL in the class constructor is provided.
- Loads and parses the local Excel file in
- Displays a list of available PH region names.
- Lists all provinces and municipalities of a specified region via commandline input.
- Asks for an option to write results to a JSON file.
- Run the script as follows if installed using
npm i ph-municipalities:node .\node_modules\ph-municipalities\src\scripts\by_region.js
npm run list:province
- Asks users to enter the download URL of a remote Excel file or use the default local Excel file
- Loads and parses the local Excel file in
/app/data/day1.xlsxby default. - Loads and parses the downloaded Excel file to
/app/data/datasource.xlsxif download URL in the class constructor is provided.
- Loads and parses the local Excel file in
- Lists all municipalities under specified province(s) via commandline input.
- Asks for an option to write results to a JSON file.
- Run the script as follows if installed using
npm i ph-municipalities:node .\node_modules\ph-municipalities\src\scripts\by_province.js
NPM Scripts for Building Windows Executable Files of the Interactive CLI Scripts
npm run build:win:region
- Package the Node.js project's
npm startscript into a stand-alone windowsnode16-win-x64executable. - The windows executable file will be stored in
/dist/ph-regions-win.exe. Click the executable file to run.
npm run build:win:province
- Package the Node.js project's
npm list:provincescript into a stand-alone windowsnode16-win-x64executable. - The windows executable file will be stored in
/dist/ph-provinces-win.exe. Click the executable file to run.
npm run build:win:all
- Package the Node.js project's
npm startandnpm list:provincescript into a stand-alone windowsnode16-win-x64executables in one go. - Each window executable file will be stored in the
/distdirectory.
NPM Scripts for Compiling the Interactive CLI Scripts into Stand-Alone Scripts
npm run minify:region
- Compiles the Node.js project's
npm list:regionscript and dependencies into a single script using ncc. - The compiled/minified file will be stored in
/dist/region. Run the command to use the compiled script:
node dist/region
npm run minify:province
- Compiles the Node.js project's
npm list:provincescript and dependencies into a single script using ncc. - The compiled/minified file will be stored in
/dist/province. Run the command to use the compiled script:
node dist/province
npm run minify:all
- Run the
npm list:regionandnpm list:provincescripts in one go. - Each compiled/minified files will be stored in the
/distdirectory.
NPM Scripts for Building Documentation
npm run generate-docs
Builds the class documentation into the /docs directory.
NOTE:
This script requires manual installation of thejsdoc@4.0.3,minami@1.2.3, andtaffydb@2.7.3packages as devDependencies inside the /app directory. These libraries, only used for building the class documentation, were excluded from the final package.json to have fewer external dependencies.npm install --save-dev jsdoc@4.0.3 minami@1.2.3 taffydb@2.7.3Installing these libraries will update the
package.jsonandpackage-lock.jsonfiles. Take care not to push changes caused by installation.
npm run docs:install
Runs the Bash script that installs the JSDoc and theme dependencies for building the class documentation only within the development Docker environment.
NOTE:
This script requires running from a Bash terminal - it won't work from a Windows command line terminal. It is reserved for building the documentation with Docker.
This script is used for building the class documentation from a local Docker environment along with the npm run docs:build NPM script.
docker exec -u root -it ph-municipalities npm run docs:install
docker exec -u root -it ph-municipalities npm run docs:build
npm run docs:build
Runs the Bash script that builds the class documentation using JSDoc only within the development Docker environment.
NOTE:
This script requires running from a Bash terminal - it won't work from a Windows command line terminal. It is reserved for building the documentation with Docker.
This script is used for building the class documentation from a local Docker environment along with the npm run docs:install NPM script.
docker exec -u root -it ph-municipalities npm run docs:install
docker exec -u root -it ph-municipalities npm run docs:build
NPM Scripts for Linting Files and Unit Testing
npm run lint
Lint JavaScript source codes.
npm run lint:fix
Fix JavaScript lint errors.
npm test
Run tests defined in the /app/__tests__ directory.
npm run example
- Downloads and parses a remote Excel file defined in the
EXCEL_FILE_URL.envvariable. - Demonstrates sample usage with
await
npm run debug
- Runs the
npm run list:regionwith--inspectflag for debugging in containers.
Class Usage
Below are example usages of the ExcelFile class, run from the /app/src/examples directory. Check out the /app/src/examples/sample_usage.js file for more examples.
Load and Parse a Local Excel File
This is a simple usage example of the ExcelFile class.
Simple Usage
const path = require('path')
const ExcelFile = require('../classes/excel')

// Use the following if installed via npm
// const { ExcelFile } = require('ph-municipalities')

// Reads an existing Excel file on /app/data/day1.xlsx
file = new ExcelFile({
   pathToFile: path.join(__dirname, '..', '..', 'data', 'day1.xlsx'),
   // fastload: false
})

// Call init() if fastload=false
// file.init()

// listMunicipalities() lists all municipalities
// for each province
const provinces = ['Albay','Masbate','Sorsogon']
const municipalitiesFromProvince = file.listMunicipalities({ provinces })

// writeMunicipalities() writes municipalities data to a JSON file
// and returns the JSON object
const json = file.writeMunicipalities({
   provinces,
   fileName: path.join(__dirname, 'municipalities.json'),
   prettify: true
})

// shapeJsonData() returns the output of writeMunicipalities()
// without writing to a JSON file
const json2 = file.shapeJsonData(provinces)

// JSON data of the parsed Excel file will is accessible on
// file.datalist
console.log(file.datalist)

// Set the contents of file.datalist
file.datalist = [
   { municipality: 'Tayum', province: 'Abra' },
   { municipality: 'Bucay', province: 'Abra' }]
Reading regions, provinces and municipalities
const path = require('path')
const ExcelFile = require('../classes/excel')

// Use the following if installed via npm
// const { ExcelFile } = require('ph-municipalities')

// Reads an existing Excel file on /app/data/day1.xlsx
const file = new ExcelFile({
  pathToFile: path.join(__dirname, '..', '..', 'data', 'day1.xlsx'),
  fastload: true
})

// listRegions() lists all regions from the regions settings file
const regions = file.listRegions()
console.log('---regions', regions)

// List region data from query
const regionQuery = file.listRegions('region_name')
console.log(`---region full name`, regionQuery)

// listProvinces() lists all provinces of a region
// for each given province
const provinces = file.listProvinces('Region IX')
console.log(`---provinces of ${regions[0]}`, provinces)

const municipalitiesFromProvince = file.listMunicipalities({ provinces })
console.log(`---municipalities`, municipalitiesFromProvince)
Download and Parse a Remote Excel File
Adding a url field in the constructor parameter prepares the class to download a remote Excel file for the data source.
Remote Excel file download example
INFO: Run the
.init()method after initializing a class with aurlparameter to start the async file download.
require('dotenv').config()
const path = require('path')
const ExcelFile = require('../classes/excel')

// Use the following if installed via npm
// const { ExcelFile } = require('ph-municipalities')

const main = async () => {
  // Excel file will be downloaded to /app/src/examples/excelfile.xlsx
  const file = new ExcelFile({
    pathToFile: path.join(__dirname, 'excelfile.xlsx'),
    url: process.env.EXCEL_FILE_URL
  })

  try {
    // Download file
    await file.init()
    console.log(file.datalist)
  } catch (err) {
    console.log(err.message)
  }
}

main()
Alternate Usage - Events
Initialize an ExcelFile class instance
require('dotenv').config()
const path = require('path')

const ExcelFile = require('../classes/excel')

// Use the following if installed via npm
// const { ExcelFile } = require('ph-municipalities')

const main = () => {
  try {
    // Initialize an ExcelFile class instance.
    const PHExcel = new ExcelFile({
      pathToFile: path.join(__dirname, 'excelfile.xlsx'),
      url: process.env.EXCEL_FILE_URL
    })

    // Download file
    PHExcel.init()

    // Listen to the instance's EVENTS.LOADED event.
    PHExcel.events.on(PHExcel.EVENTS.LOADED, () => {
      console.log('--Excel data loaded!', PHExcel.datalist)
    })
  } catch (err) {
    console.log(`[ERROR]: ${err.message}`)
  }
}

main()
Using a Custom Configuration File
The ph-municipalities ExcelFile and ExcelFactory classes use a default configuration file to define their regions and provinces in the /app/config/regions.json file. The data in this file syncs with the PAGASA Seasonal and 10-Day Weather Forecast Excel files provinces and municipalities naming convention, encoded by hand as of August 24, 2024.
Follow the codes to define a custom regions config file, following the format of the /app/config/regions.json file to customize region definitions.
Note: The custom config file's province/municipality names should match those in the 10-day Excel file.
Availability
This method is available from ph-municipalities version 1.3.3 and higher.
config.json
{
  "metadata": {
    "sources": [
      "http://localhost:3000"
    ],
    "title": "List of Random Provinces by Regions",
    "description": "Sample regions config file",
    "date_created": "20240824"
  },
  "data": [
    {
      "name": "Mondstat",
      "abbrev": "MON",
      "region_num": "1",
      "region_name": "The City of Freedom",
      "provinces": ["Brightcrown Mountains","Galesong Hill","Starfell Valley","Windwail Highland","Dragonspine"]
    },
    {
      "name": "Inazuma",
      "abbrev": "INZ",
      "region_num": "3",
      "region_name": "The Realm of Eternity",
      "provinces": ["Narukami","Kannazuka","Yashiori","Watatsumi","Seirai","Tsurumi","Enkanomiya"]
    },
    ...
  ]
}
Custom config usage
require('dotenv').config()
const path = require('path')

const ExcelFile = require('../classes/excel')

// Use the following if installed via npm
// const { ExcelFile } = require('ph-municipalities')

const config = require('./config.json')

// Load the local Excel file
const file = new ExcelFile({
  pathToFile: path.join(__dirname, '..', '..', 'data', 'day1.xlsx'),
  fastload: true,
  // Use a custom settings file to define region info
  settings: config
})

// Load provinces from the custom config file
const provinces = file.listProvinces('Inazuma')

// List the municipalities of defined provinces in the config file
// Note: Province/municipality names should match with those in the 10-day Excel file
const municipalities = file.listMunicipalities({ provinces })

console.log('---provinces', provinces)

console.log('\nProvince/municipality names should match with those in the 10-day Excel file')
console.log('---municipalities', municipalities)
Building Standalone Windows Executables
The main npm scripts can be packaged into standalone windows executables. Pre-compiled windows binaries are available for download in the latest Releases download page.
- Run any of the following scripts to build the programs.
npm run build:win:region npm run build:win:province # npm run build:win:all - Click the resulting executable files in the
/distdirectory to execute.
Compiling into Single, Minified Files
The main npm scripts can be compiled into standalone JavaScript files together with all its dependencies.
- Run any of the following scripts to compile the source codes.
npm run minify:region npm run minify:province # npm run minify:all - Run the compiled source codes in the
/distdirectory to execute.node dist/region node dist/province
Building the Class Documentation
The class documentation uses JSDoc annotations where applicable in the JavaScript source codes inside the /src directory. There are two (2) options for building the class documentation.
Using Docker
-
Run docker for localhost development. Refer to the Docker for Localhost Development section for more information.
-
Install the dependencies for JSDoc. Suceeding builds will not need to install dependencies after an initial installation. Refer to the npm run docs:install script usage for more information.
docker exec -u root -it ph-municipalities npm run docs:install -
Build the documentation. Refer to the npm run docs:build script usage for more information.
docker exec -u root -it ph-municipalities npm run docs:build -
View the generated documentation in the
/app/docsdirectory. Click the/app/docs/index.htmlfile to launch the documentation website.
Using NodeJS
-
Install the dependencies for JSDoc. Refer to the
npm run generate-docsScript usage for more information. -
Copy Bash scripts to the /app directory.
- Create a /scripts directory inside the /app directory.
- Copy the
/scripts/docs-install.shand/scripts/docs-build.shBash scripts to the /scripts directory created from the previous step.
-
Copy static assets to the /app directory.
- Copy the
/docs/diagramsdirectory inside the /app directory. - Copy the
README.mdfile to the /app directory.
- Copy the
-
Add appropriate user permission to the files.
chmod u+x scripts/docs-install.sh chmod u+x scripts/docs-build.sh -
Run the commands for building the documentation.
INFO: Use a GitBash terminal if you are working on a Windows OS machine.
./scripts/docs-install.sh ./scripts/docs-build.sh -
View the generated documentation in the
/app/docsdirectory. Click the/app/docs/index.htmlfile to launch the documentation website.
Troubleshooting
This section describes several common errors and related fixes.
EACCESS: permission denied
Information
- This error usually happens when writing to files inside Docker-mounted volumes on an Ubuntu host during run time.
- A full sample error log is:
EACCESS: permission denied, open '/opt/app/region1.json'
Fix
- Find the host UID of the ph-municipalities Docker user. Its name is
"app,"defined in the Dockerfile.
docker run --rm -it ciatph/ph-municipalities:dev sh -c "id -u app" - Change the ownership of the
./appdirectory using the ph-municipalities user host UID from step #1.
sudo chown -R <APP_UID>:<APP_UID> ./app - Re-run the NPM script.
Malformed text characters in the municipality names
Information
- Sometimes, garbled or malformed text like
"├â┬▒","ñ", and others are present in the PAGASA 10-Day Weather forecast Excel files. - This usually occurs when there is a character encoding mismatch when writing data in
UTF-8format in Excel files, but the ph-municipalities scripts (or Microsoft Excel, Notepad or other programs) interpret it asANSI(Windows-1252) or some other encoding.
Fix
Convert the malformed text to its original text counterparts.
- Add the malformed characters and their expected character conversions in the
SPECIAL_CHARACTERSenv variable as pipe-delimited key-value pairs. - For example, the
"├â┬▒"and"ñ"actually translate to the"ñ"character. Write them in theSPECIAL_CHARACTERSvariable as:SPECIAL_CHARACTERS=├â┬▒:ñ,ñ:ñ - Add a blank space after the
":"character if the malformed text does not have any conversion.SPECIAL_CHARACTERS=├â┬▒:ñ,ñ:ñ,â:
@ciatph
20220807